Literacy Activities page
This page currently contains up to 20 different activities (depending on the language and writing system) you can use to support a wide variety of literacy needs. Each button at the top of the Control Panel produces its own activity in the main page. The activities range from supporting pre-literate skills to producing complex word search puzzles and more. Some of these are suited for producing assessments for groups and others can be used for individual students interacting with the computer. The activities are grouped into 4 categories: symbol or letter level, syllable level, word level and complex layouts that can be used to create printed worksheets. Each activity uses the the control panel’s settings for producing the content of the activities. This means you have a lot of control over which letters or words a student will see in these activities. Each activity also comes with its own set of controls to further fine-tune the appearance or functionality. These activity controls appear between the white page and the top menu bar. Some of these activities include the presence of an on-screen stopwatch which allows you to use it as an interactive activity with a student.
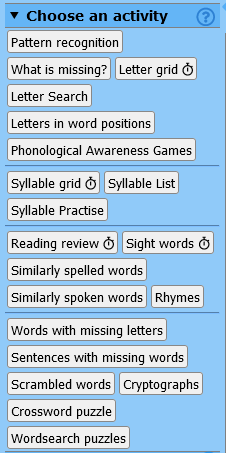
Activities Menu
- Pattern recognition
- What is missing?
- Letter Grid (game)
- Find the same (game)
- Letter Search
- Letter Position
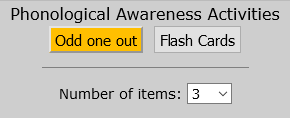
- Phonological Awareness
- Odd one out (game)
- Flash Cards (game)
- Syllable Grid
- Syllable List
- Syllable Practise (game)
- Reading Review
- Sight Words
- Similarly Spelled
- Similarly Pronounced
- Rhymes
- Missing Letters
- Missing Words
- Scrambled Words
- Cyrptographs
- Crosswords
- Wordsearch
Symbol or Letter Level Activities
Pattern recognition -

The Pattern recognition activity can be used for pre-literate skills or the development of visual discrimmination skills. It does not use letters to develop these skills.
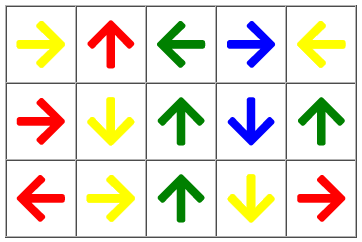
Since literacy is a process of converting visual stimulii into verbal responses these skills can be developed and practised with other symbols. This activity uses colours, shapes, arrows, clocks, animals, dice, braille dots and numbers to present to the student. You can control the font size, grid size and spacing of the gride. Some of the symbols can be varied by colour and size. The student can practise finding other instances of the same symbol (without a verbal response to develop visual recognition) or the student can be asked to respond verbally to name the symbol. This is the neural pattern of “see something - say something” which forms the basis for reading.
What is missing? -
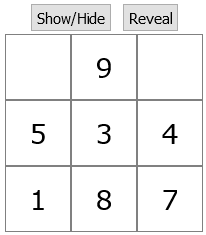

This activity uses the numbers from 1-9 to create a grid of 9 squares while leaving some spaces empty. The student must identify which numbers are missing from the grid. The numbers are arranged randomly and the number of blank spaces can be controlled. Each grid has a button to hide the entire grid so a facilitator can allow the student to look at the grid for a certain amount of time and then hide it and ask the student to name the missing numbers or recall the sequence of each row in the grid. This improves visual recall skills. Each grid also has a button to reveal the missing numbers. You can also create multiple grids (up to 12) on the page to print them off and use as a paper-based activity.
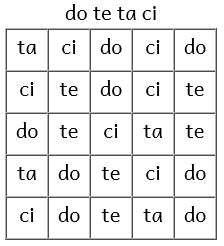
Letter grid (includes a game) -

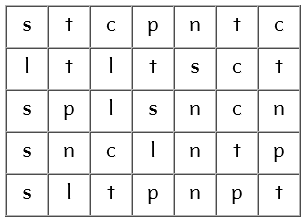
The letter grid places letters in a grid to allow for the same visual discrimmination practise as with the symbols. You can control the font size and the number of columns and rows. You must select either the consonants or vowels checkbox or both. If you don’t select the “Use all letters” then the grid will be filled with only the letters that have been selected in the Control Panel. This would allow you to practise with only the letters a student is familiar with. If you do select the “Use all letters” option then the entire alphabet including any digraphs (or multigraphs) will be used to fill the grid. If the writing system uses upper and lower cases then you can control which case letter will be used to fill in the grid, or you can mix both cases. The button “Copy Letters” lets you copy the grid to the clipboard to use in another program like a spreadsheet or word processor. The button “Store this page” lets you store the page to SynPhony’s libary to build your own custom set of activity sheets.
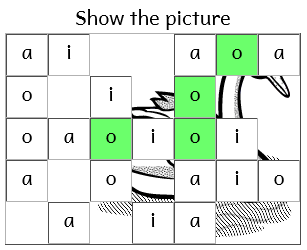
Game! - The option “Play Find the Same” is an interactive game you can play on the computer. The layout is the same grid as before but in this game the goal is to find and click on all of the same letters in the grid. Pick a letter and then click on all the squares that contain the same letter. Each time you click the square turns green. When all instances of the same letter have been found that letter disappears the square reveals a part of a picture. Pick another letter and then find and click on all the instances on the grid. When all of the letters have been removed the entire picture is revealed. The student should say the sound (or name) of the letter (or digraph) each time they click on the letter. This reinforces the letter-sound relationship in the mind of the student. The picture fills a square grid better than a rectangular one.
Letter search - (assessment) -

The Letter search activity is for making letter knowledge assessments. This activity creates a chart in which each letter that has been selected in the Control Panel appears on the left side of the chart. The letter in the gray column is the key letter. It also appears once in the same row among several other letters (which we can call the distractors). The way to use this assessment is the teacher prints out 2 versions of the chart; one for the teacher (with the key letters visible) and another copy for the student(s) without the key letters. The teacher either says the name or the sound of the key letter and the student(s) must circle the correct letter in the row.
The controls for this activity are many. You can change the font size. Then you can show or hide the key column as well as highlight the key letter. (For the student version you will want to unselect the highlight for the key letter.) You can choose to use all the letters or else the program will only use the letters which have been selected in the Control Panel. You can choose to use only consonants or vowels or both. You can choose to include multigraphs. You can choose to make the key letter or the distractors either upper or lower case. You can also control how many distractors to use as well as how many different letters (other than the key letter) to use in each row. Finally, you can also choose to use visually similar letters in each row to make it a bit harder to identify the correct letter.
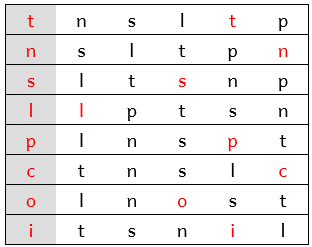
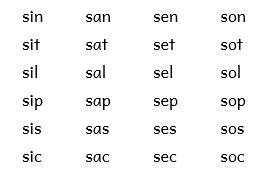
Letters in word position -
Sometimes you want to find certain letters in specific positions in words, be they at the beginning of a word, the middle, or the end. For languages which use the Arabic script this is particularly useful as the letter can take on an entirely different shape depending on where in the word it appears.


The activity controls are divided into 2 parts; single sounds and cluster sounds. Then each part has 3 positions (beginning, middle and end) and 2 letter categories (consonants and vowels). Thus you can choose whether to search for single consonant sounds at the beginning of words, middle or ending position. For the example graphic, the selection was cluster sounds, consonants and word beginning. Then the item chosen from the options was the cluster "sl". The resulting words show that each word begins with "sl". You can also combine two selections to create a narrower search but it may sometimes not find any words with every combination. Clicking on the “Clear all” button restores all the options to the default again.
You can change the font size and copy the words to the clipboard to use in another program. There is also the option to perform a custom search by clicking on the magnifying glass and entering the letters you wish to search for. Clicking on the help button in the custom search box brings up a help file with information on how to use regular expressions to create more specific searches.
Phonological Awareness Games -
Games! - Phonological awareness means that a person can hear and identify the various sounds that make up a word. This skill can be taught and developed and has been found to be a good predictor of acquiring literacy skills. This activity currently contains 2 games that can help a student develop this skill: Odd One Out and Flash cards.
Odd One Out - hearing rhymes -
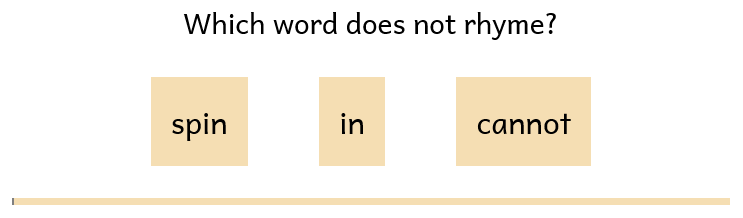
The object of this game is to hear which words rhyme and which one doesn’t. The teacher can read the words (if the student can’t read them) and the student must say which word does not rhyme with the other ones. When you click on a word and it is correct (it does not rhyme with the others), the word bounces up and down (yes) and the progress bar moves up one position. If the word is not correct, the word shakes back and forth (no) and the progress bar moves back one position (if possible). The progress bar should motivate the student to make more attempts and reach 10 correct choices.
Flash cards -
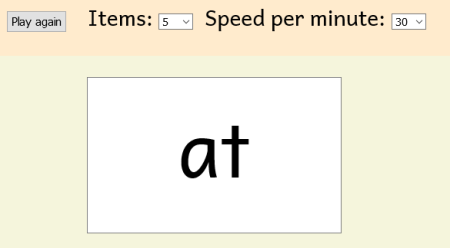
This game is a traditional flash card activity. You can control how many items to display and the length of time to display each item. The student must try to read each item and keep up with the speed. If it is too fast then you can extend the time the item remains visible.
Syllable Level Activities
Syllable Grid -

Some students can benefit from practising reading with predictable changes in the patterns. The activity controls let you change the font size, copy the grid to the clipboard to use in another program like a spreadsheet or word processor and add the page to SynPhony’s library.
This activity produces a grid of syllables that vary predictably. Each column in the grid will contain the same vowel. The number of vowels (and thus columns) depend on which vowels have been selected in the Control Panel. In the activity controls there are two sections, one labelled “Display” and the other labelled “Repeat”. The “Display” section contains 3 checkboxes. The center checkbox represents the vowel and cannot be modified. The checkbox on either side of the vowel represents a consonant that can be selected. So you can choose to create syllables that either begin with a consonant or end with a consonant or both. So you can create CV, VC and CVC syllables. Further, the “Repeat” contains 3 options. The two radio buttons let you control which position will repeat the consonant, either the first consonant or the last one. Finally, you can also select which specific consonant will be used in the repeating position by selecting a consonant from the drop-down box.
When reading the grid across the student changes only the vowel sound in each syllable. When reading the grid down a column the student needs to change only one of the consonants in each syllable, either the first or the last consonant, the other one being repeated.
Syllable List -
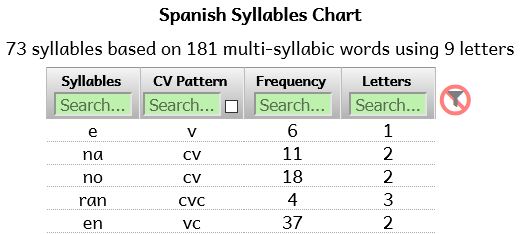

The Syllable List activity is a simple report that will give you a list of actual syllables from real words in the language. The report is almost the same as the one you can find in the “Reports” page with the additional feature that the list changes depending on which letters and the number of syllables you have selected in the Control Panel, as well as the search mode you are using. Also, this report only uses multi-syllable words to display the syllables. So this report is dynamic and will change each time you add additional letters or change the other parameters.
Syllable Practise - (includes 2 games) -
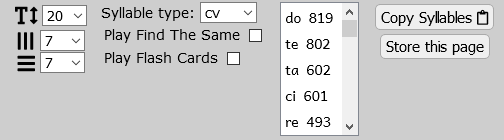
This activity creates a grid of syllables. You can choose how many rows and columns the grid should have as well as the font-size. You can also choose which kind of syllable shape to use to fill the grid, based on the kinds of syllable shapes that exist in the language. You can also copy the entire grid to the clipboard to use in other programs such as a spreadsheet or a word processor. You can also store the grid to SynPhony’s library.
There are two steps to using this activity. First, choose the syllable shape you wish to use to fill the grid. Next, select the actual syllables. The first time you access this activity you will see a message that states: "Pick at least 3 syllables from the list above." To do this you can click on the syllables while pressing the “Ctrl” button on your keyboard. This allows you to select multiple items from the list. You can choose as many syllables as you like.
You can print the grid to paper and use it for practise with a student. You can also choose to play 2 games that focus on the same syllables. These two games are the same games that exist in the “Letter grid” activity and “Phonological Awareness” activity. You can read the description for “Find the same” here and the for “Flash cards” here.
Word Level Activities
Reading Review -

This activity can be used to create a list of words that chooses a number of words from each of the spelling patterns that have been covered. So this activity is useful for creating a review list. The controls let you change the font size and the number of columns. You can also copy the words to the clipboard for use in other program such as a word processor as well as storing the page to SynPhony’s library.

The option “Minimum words” determines the number of words for each spelling pattern. You may end up with more words which contain the same spelling pattern but not less. You can also choose how many spelling patterns to use for creating the review list. If you don’t use the option “All” then the program will begin with the most recent spelling patterns first and work backwards to patterns chosen at an earlier time. You can also choose words based on their frequency of use. You can choose to use words which occur in the top, middle or bottom frequency range. You can also choose the words randomly. Further, you can also choose words from the top 10, the top 10-20 most frequent, or the bottom 10 or the bottom 10-20 least frequently occuring words that contain the chosen spelling patterns.
The option “Show spelling patterns” displays a table with a frequency count of all of the spelling patterns used in the displayed review words. The patterns which are green are the ones which have been selected based on the Spelling patterns option in the controls. Clicking on the labels at the top of the table will sort that column. Clicking on it again sorts it in reverse order.
Sight Words -
Sight words is a common term used in English to refer to words that occur very often but have rather rare spelling patterns. These criteria could be applied to any other language as well. This activity identifies words based on two different frequency factors: word frequency and letter (or spelling pattern) frequency. Some words occur more frequently in texts and speech than others and some sounds or letters occur in words more frequently than others. Frequently occuring words need to be learned well and early so they don’t hold up a learner’s progress. This activity let’s you find those words.
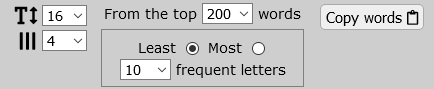
The activity controls let you change the font size and the number of columns. You can also copy the results to the clipboard to use in other programs such as a word processor. Next, you can choose how many of the top words to begin searching through for rare (or common) spelling patterns. The options range from 50-500 of the most frequent words. Then, you can select to search for a particular number of either the most common or least common spelling patterns. The range of spelling patterns will vary depending on how many patterns exist in the language. So you can find the common patterns among the most frequent words or you can find the rarer patterns among the most frequent words. Both criteria make for interesting results.
The following two graphics illustrate these two different approaches.


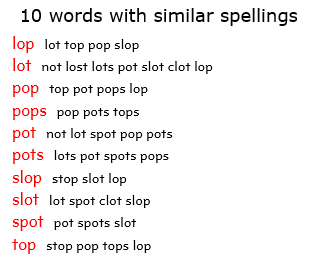
Similarly spelled words -
This is a really cool feature. This activity finds words that are very similar to each other. The similarity can be either: 1 letter removed, 1 letter added, or 1 letter different. If a student can read these words (you don’t have to make them read all of them; just some to test them), then you know that they are seeing all of the letters and they are making the necessary distinctions correctly.

The activity controls let you change the font size and the number of columns as well as copy
the results to the clipboard for use in another program such as a word processor. When you start
this search you will receive a warning that this can take a while and give you the opportunity to
cancel the search. The amount of time it takes depends on how many words are in your database and
how many words you allow it to search through. You can restrict the number of words to process in
the option labeled “Process” from 100-3000 words or all of them. Each word is
compared to all of the other words. For every result one word is the key word and all of the
other words differ by only 1 letter. The key word is coloured red and the similar words are black.
Further, you can set the minimum and the maximum number of words to find before it is considered
a successful match. Finally, you can also control whether the similarity between the words should
occur at the beginning, the middle or the end of the word.
Similarly pronounced words -
This activity is very similar to the previous one (Similarly spelled words). If the language has letters that have multiple pronunciations then this could be useful. Otherwise it is no different than the previous one.
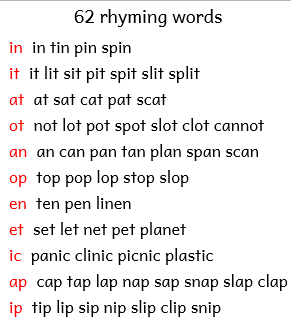
Rhyming words -

This activity finds words which rhyme. The controls let you change the font size and the number of columns. You can also copy the words to the clipboard to use in another program such as a word processor. You can also control for the minimum and maximum number of words to list. You can also select which kind of rhyming pattern to match for: just the final vowel, a VC pattern, or a CV pattern.
The result will place the pattern first, then followed by all of the words which match that pattern.
Advanced activities
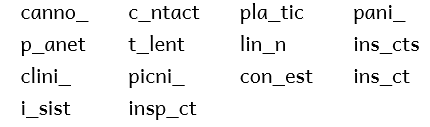
Words with missing letters -
This activity is a simple spelling activity which means it is not suitable for 1st grade children in most cases.

The controls let you change the font size and the number of columns. You can also copy all the words into the clipboard to use in other programs and store the page into SynPhony’s library. You can control how many words get placed on the page, from 10-100. You can choose the words at random or else the words will be displayed in the same order as in the Word list page. You can also select which letter is removed and replaced with an underscore, either the first, the last or randomly.
Sentences with missing words -
This activity requires a student to be able to read and understand sentences which means it is probably not suitable for 1st grade children in most cases.


This activity requires that the user supply their own sentences. These can be pasted into the text box labelled “Your own sentences”. The format should be 1 sentence per line. When you have pasted them, click outside the text box and the program will then process them and build the layout. This can look like this:
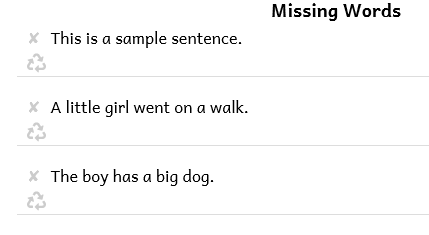
Each sentence is placed in a section with 2 lines. When you click on a word in the sentence, the word is replaced with a blank line and the word is added to the line below. Click on another word and you will have two blank spaces and two words in the second line. The page can be printed out and the object is for the student to write the correct word into the correct space so that the sentence makes sense. The result can look like this:

You can undo an action by clicking on a space again to remove the word from the second line and place it in the original sentence again.
The controls let you change the font size and randomize the second line of words. You can limit how many sentences to display on the page and you can change the size of the blank space to account for a student’s larger handwriting. You can also mix up the words in the second line by clicking on the recycle icon. If you want to remove a sentence entirely from the page you can click on the X. Finally, you can copy the layout to the clipboard to use in other programs such as a word processor and store the page to SynPhony’s library.
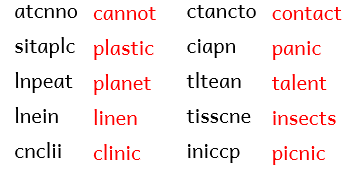
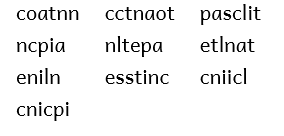
Scrambled Words -
This activity requires a student to be able to read and rewrite scrambled words which means it is probably not suitable for 1st grade children in most cases.

The controls let you change the font size and the number columns. You can also copy the words to the clipboard to use in another program such as a word processor and store the page into SynPhony’s library. Further, you can control how many words get placed on the page, from 10-100 or all. You can also randomize the words on the page and show the correct words beside each scrambled word.
Cryptographs - words in code -
This activity requires a student to be able to read and substitute letters which means it is probably not suitable for 1st grade children in most cases.
This activity promotes critical thinking skills. The words must be deciphered according to a key in order to become readable.

The controls let you change the font size and the number of columns. You can also copy the words to the clickboard to use in another program such as a word processor or spreadsheet. You can also store the page to SynPhony’s library.
You can choose to place the lookup key table vertically on the left side of the page if it becomes too wide to fit at the top. The lookup key table consists of 2 rows of either letters or letters and numbers. The top row is the key and the bottom row contain the real letters. It can be easier to do this activity if you use numbers as the lookup key at first.
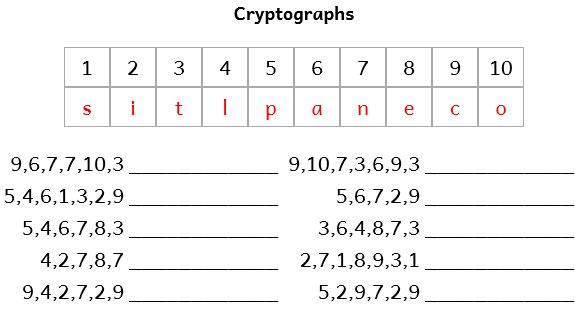
Use this activity as follows: look at the first number of the first coded word. Then look up that number on the top row of the key and notice which letter is below it. Write that letter in the space to the right of the coded word. Next, look at the second number in the coded word. Look up that number and notice the letter below it and write that letter as the second letter of the coded word. Repeat until finished. When you are done you can read the word.
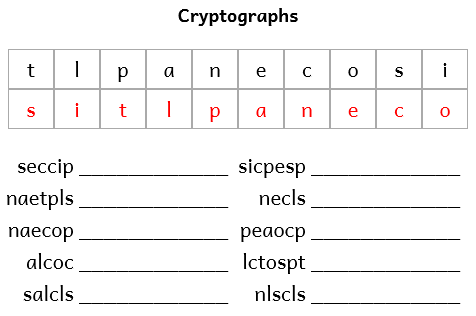
The second way to use this activity is a little harder because it is easy to mix up which line of the key is the lookup line and which is the line with the actual letters to write. To do this unselect the “Use numeric keys” option. The red letters are the letters the student writes in the spaces. The black letters are the coded letters.
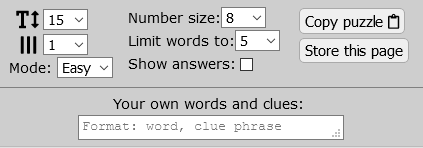
The controls let you modify how far to offset the lookup keys from the letters. The default of 2 is sufficient in most cases. You can also randomize the keys if you want. To create a teacher’s copy with the correct words in place you can select the option “Show real words” and print off the page. You can set the maximum number of words 5-100 or all words. You can also randomize the order of the words.
Crossword puzzle -
This activity produces the well known crossword puzzles. As such it is probably not suited for 1st grade students in most cases. In the default mode this puzzle places the words to fill in at the bottom of the page. This will allow even beginners to learn how to do crosswords. They must read the word, find the correct square on the grid, and write the word either across or down in the spaces provided.
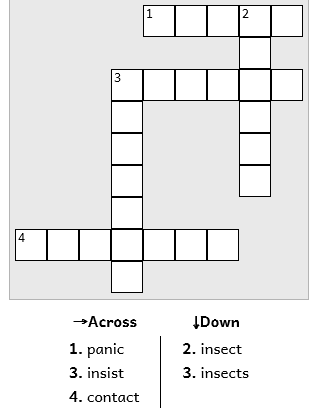
The activity controls let you change the font size. The option to change the columns applies to the words below the puzzle. You can change the size of the numbers in the puzzle by selecting the option “Number size”. You can control how many words are in the puzzle by using the option “Limit words to”. The range is from 5-40. You can also fill in the puzzle by selecting the option “Show answers”. You can copy the puzzle to the clipboard to use in another program and you can store the page to SynPhony’s library.
You can also provide your own set of words along with clues for each word. This cannot be done automatically by SynPhony because it requires people to select the words and write the clues for each word. If you wish to do this you can prepare the words in a word processor by typing a word then a comma and then the clue next to the word. The comma is important to separate the clue from the word. Copy and paste the entire list into the text box. The puzzle should appear when you click outside of the text box.
Using this approach it should also be possible to create bi-lingual crossword puzzles in which the clue words are in one language and the student must guess the correct translation and write them in the puzzle. So the format would be: word comma translation.
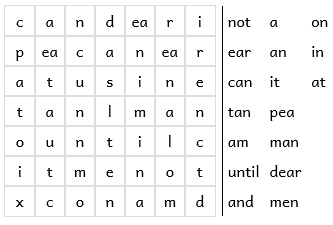
Wordsearch puzzle -
The wordsearch controls give you tremendous control over the appearance of the puzzles. I want to thank Robert Klein for the code to create these puzzles. I have modified it to enable it to process other writing systems besides Latin.

The controls let you modify the font size, the number of rows and columns, whether to sort the words alphabetically, whether to use only lower case letters and whether to show the gridlines or not. You can limit the number of words to use for each puzzle and whether to limit the filler letters to those letters used in the words (which are controlled by the letters you have selected in the control panel). This will make it a bit harder to find the hidden words. A really powerful feature is the ability to produce multiple puzzles per page with a single selection. Each of the puzzles are generated from the same list of words which have been searched for based on the selected letters in the control panel as well as the search mode. So the puzzles are all at the same level of difficulty. If you wish to reduce the area where the puzzles appear a bit you can use the zoom feature. You can copy the puzzle to the clipboard to use in another program such as a spreadsheet or word processor and you can save the page to SynPhony’s library.
The final set of options control the direction of the hidden words and the shape of the entire puzzle. You can control direction of the words in a line, either forward, backwards, or both. You can also control whether the words appear in a horizontal line, a vertical line or in mixed directions. You can also control whether the words may move diagonally, may not move diagonally, or move in mixed directions. Finally, you can choose the shape of the puzzle. If the shape is larger you should not try to place more than 1 puzzle per page. You can use the zoom tool to reduce the size, if needed. The shapes are: a square (you determine the size), a car, diamond, spiral, star, the shape of an X, a clover, stripes, a circle, a smile, the shape of the letter V, a triangle, a small checkerboard, and a large spiral. You may want to copy and paste the larger puzzles into a spreadsheet where you can control the height and width of the cells for the entire puzzle .